

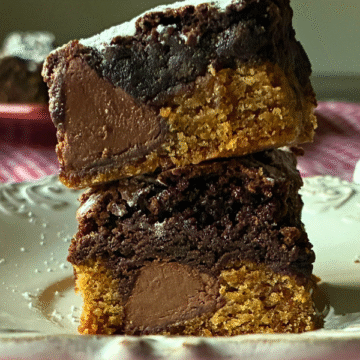
These Peanut Butter Blossom Chocolate Crinkle Cookie Bars combine two of my favorite Christmas cookies into one delicious dessert! They have a soft, chewy peanut butter cookie base, a rich chocolate crinkle layer, and a hidden Hershey’s Kiss inside every square.
You get all the flavors of classic peanut butter blossoms and chocolate crinkle cookies, but without rolling individual cookies or baking multiple batches. Just layer, bake, and slice!
They’re perfect for Christmas cookie platters, holiday parties, and cookie exchanges, especially if you love peanut butter and chocolate together.
Why You’ll Love These Peanut Butter Blossom Cookie Bars
- Two classic cookies in one. Peanut butter blossoms meet rich chocolate crinkle cookies.
- A hidden chocolate surprise. Every square has a Hershey’s Kiss baked inside.
- Soft and chewy. A tender peanut butter base topped with a fudgy chocolate layer.
- Perfect for Christmas. A fun addition to holiday cookie platters and cookie exchanges.
- No individual cookie shaping. Everything bakes in one 9×13-inch pan.
- Easy to make ahead. Bake, cool, and slice when you’re ready to serve.
What Are Peanut Butter Blossom Chocolate Crinkle Bars?
Think of these as a mash-up of two classic Christmas cookies.
The bottom layer is a soft peanut butter cookie, similar to a traditional peanut butter blossom. Instead of pressing a Hershey’s Kiss on top, you tuck the chocolate candies into the dough.
Then you spread a rich chocolate crinkle cookie batter over everything and bake until the layers are set.
Once sliced, each bar reveals a little chocolate Kiss surrounded by peanut butter cookie and chocolate.
It’s a fun twist on the classics, and you don’t have to make two separate batches of cookies!
Ingredients You’ll Need
These chocolate peanut butter cookie bars have two simple layers made with familiar baking ingredients.
Peanut Butter Cookie Layer
- 1¾ cups all-purpose flour: Gives the peanut butter cookie base its structure.
- 1 teaspoon baking soda: Helps the cookie layer rise.
- ½ teaspoon salt: Balances the sweetness.
- ½ cup granulated sugar: Adds sweetness and helps create tender edges.
- ½ cup brown sugar: Keeps the peanut butter layer soft and chewy.
- ½ cup unsalted butter, softened: Adds richness and moisture.
- ½ cup creamy peanut butter: Gives the bars their classic peanut butter blossom flavor.
- 1 large egg: Binds the dough together.
- 2 tablespoons milk: Adds moisture.
- 1 teaspoon vanilla extract: Enhances the peanut butter flavor.
- 20–24 Hershey’s Kisses, unwrapped: The hidden chocolate surprise inside each bar.
Peanut butter tip: I recommend a traditional creamy peanut butter like Jif or Skippy. Natural peanut butter can separate and change the texture of the dough.
Chocolate Crinkle Cookie Layer
- 1 cup granulated sugar: Sweetens the chocolate layer.
- ½ cup unsweetened cocoa powder: Gives the bars a deep chocolate flavor.
- ¼ cup vegetable oil: Helps keep the chocolate layer soft and fudgy.
- 2 large eggs: Give the batter structure.
- 1 teaspoon vanilla extract: Brings out the chocolate flavor.
- 1 cup all-purpose flour: Provides structure without making the chocolate layer too dense.
- 1 teaspoon baking powder: Helps the chocolate layer rise.
- ¼ teaspoon salt: Balances the sweetness.
- Powdered sugar: For a classic chocolate crinkle cookie finish.
How to Make Peanut Butter Blossom Chocolate Crinkle Cookie Bars
These layered cookie bars are easier than they look! You’ll start with the peanut butter cookie base, add the Hershey’s Kisses, and finish with chocolate crinkle batter.
Step 1: Prepare the Pan
Preheat your oven to 350°F.
Line a 9×13-inch baking pan with parchment paper, leaving a little overhang on the sides so you can lift the bars out after baking.
Step 2: Make the Peanut Butter Cookie Dough
In a medium bowl, whisk together the flour, baking soda, and salt.
In a separate large bowl, beat the softened butter, granulated sugar, and brown sugar until light and fluffy.
Mix in the peanut butter, egg, milk, and vanilla until combined.
Gradually add the dry ingredients, mixing just until a soft cookie dough forms.
Step 3: Add the Hershey’s Kisses
Press the peanut butter cookie dough evenly into the bottom of the prepared pan.
Arrange the unwrapped Hershey’s Kisses in evenly spaced rows, with the pointed tips facing upward.
Press each Kiss about halfway into the dough, just enough to keep it standing upright.
Tip: Plan your rows around how you’ll cut the finished bars so each square has a Hershey’s Kiss in the center.
[PROCESS PHOTO: Peanut butter cookie dough in pan with Hershey’s Kisses arranged in rows]
Step 4: Partially Bake the Peanut Butter Layer
Bake the peanut butter layer for 10–12 minutes, just until the dough begins to set.
You don’t want to bake it completely because it will finish baking with the chocolate layer.
Step 5: Make the Chocolate Crinkle Batter
While the peanut butter layer is baking, prepare the chocolate topping.
In a medium bowl, whisk together the flour, baking powder, and salt.
In a separate bowl, mix the granulated sugar, cocoa powder, and vegetable oil until combined.
Add the eggs one at a time, followed by the vanilla.
Gradually stir in the dry ingredients until just combined. The batter will be thick.
Step 6: Add the Chocolate Layer
Remove the partially baked peanut butter layer from the oven.
Drop spoonfuls of chocolate crinkle batter over the warm peanut butter base, working around the Hershey’s Kisses.
Gently spread the batter into an even layer, covering the peanut butter dough and chocolate candies.
Don’t press down too hard! You want the Hershey’s Kisses to stay upright inside the bars.
Step 7: Bake the Cookie Bars
Return the pan to the oven and bake for another 20–25 minutes, until the chocolate layer looks set and is no longer wet or glossy.
Avoid overbaking, which can dry out the peanut butter layer.
Step 8: Cool, Dust, and Slice
Allow the cookie bars to cool completely in the pan.
For cleaner slices, refrigerate for about 20–30 minutes after cooling.
Lift the bars out using the parchment paper and cut into squares, making sure each square has a Hershey’s Kiss inside.
Dust lightly with powdered sugar before serving.
Tips for Perfect Peanut Butter Chocolate Cookie Bars
Use creamy peanut butter. Traditional creamy peanut butter works best for a smooth, soft cookie base. Natural peanut butter can make the dough oily or crumbly.
Don’t fully bake the peanut butter layer. The initial 10–12 minutes are just enough to set the base before adding the chocolate batter.
Keep the Hershey’s Kisses upright. Press them halfway into the dough with the tips facing up. This helps create that fun chocolate surprise when you slice the bars.
Spread the chocolate batter gently. Drop spoonfuls across the pan before spreading so you don’t have to drag the batter over the Kisses.
Don’t overbake. The chocolate layer should look set, but you don’t want to bake away that soft, fudgy texture.
Cool completely before cutting. These bars need time to firm up so the layers stay together.
Dust with powdered sugar at the end. Wait until the bars have cooled so the sugar doesn’t melt into the chocolate.
How to Get a Hershey’s Kiss in Every Square
This is one of my favorite little tricks for making these cookie bars look extra special.
Before baking, arrange the Hershey’s Kisses in straight, evenly spaced rows. Think about where you’ll make your cuts once the bars are finished.
For 24 smaller bars, arrange the Kisses in a 4-by-6 grid. If you prefer 20 larger bars, use a 4-by-5 grid.
Press each Kiss halfway into the peanut butter dough so it stays upright while baking.
When the bars are completely cool, cut between the rows. That way, every square has its own chocolate center!
Can I Make These Cookie Bars Ahead of Time?
Absolutely! These are a great make-ahead Christmas dessert, especially when you’re baking several different kinds of cookies.
Bake the bars and let them cool completely. Store them in an airtight container, then slice and dust with powdered sugar closer to serving.
You can also make them a day ahead for a holiday party or cookie exchange.
How to Store and Freeze Peanut Butter Blossom Cookie Bars
At room temperature: Store the cooled bars in an airtight container for up to 4 days. Place parchment paper between layers to prevent sticking.
In the freezer: Wrap the bars individually or separate them with parchment paper in a freezer-safe container. Freeze for up to 3 months for best quality.
Thaw at room temperature before serving.
If you’re freezing them, wait to add the powdered sugar until after they’ve thawed.
Frequently Asked Questions
Can I use natural peanut butter?
I recommend traditional creamy peanut butter like Jif or Skippy. Natural peanut butter tends to separate and may change the texture of the peanut butter cookie layer.
Do I need to chill the cookie dough?
No! Both layers can be prepared and baked right away. The only chilling I recommend is after baking if you want cleaner slices.
Why do you bake the peanut butter layer first?
Partially baking the peanut butter layer helps it set before adding the chocolate batter. This keeps the two layers more distinct and prevents the chocolate topping from sinking into the dough.
How do I know when the chocolate layer is done?
The top should look set rather than wet or glossy. Because the chocolate layer is dark, it’s easier to judge doneness by its texture than by color.
Can I use a different kind of chocolate candy?
Yes! You can try different varieties of Hershey’s Kisses, including dark chocolate or caramel-filled versions. Keep in mind that filled chocolates may soften or spread differently during baking.
Why are my cookie bars dry?
Overbaking or adding too much flour can make the bars dry. Spoon and level your flour rather than scooping directly from the bag, and check the bars near the end of the baking time.
Can I freeze these Christmas cookie bars?
Yes! These bars freeze well for up to 3 months. Store them in an airtight freezer-safe container and add the powdered sugar after thawing.
More Christmas Cookies and Desserts You’ll Love
If you love these peanut butter blossom chocolate crinkle cookie bars, here are a few more holiday baking favorites:
- Peanut Butter Blossom Pie: All the classic peanut butter and chocolate flavors in a delicious pie.
- Chocolate Dipped Holiday Butter Cookies: Buttery cookies dipped in chocolate and decorated with festive sprinkles.
- Best Thick and Chewy Chocolate Chip Cookies: A classic cookie with soft centers and plenty of chocolate.
- Fudgy One Bowl Brownies: Rich, fudgy brownies that are easy to make.
These Peanut Butter Blossom Chocolate Crinkle Cookie Bars are such a fun way to combine two classic Christmas cookies. They’re soft, chocolatey, and have a little surprise hidden in every square.
And since everything bakes in one pan, they’re a lot easier than making two separate batches of cookies!
Peanut Butter Blossom Chocolate Crinkle Cookie Bars
Ingredients
- Peanut Butter Cookie Layer
- 1 ¾ cups all-purpose flour
- 1 tsp baking soda
- ½ tsp salt
- ½ cup granulated sugar
- ½ cup brown sugar
- ½ cup unsalted butter (softened)
- ½ cup creamy peanut butter
- 1 large egg
- 2 tbsp milk
- 1 tsp vanilla extract
- 20 24 Hershey’s Kisses
- Chocolate Crinkle Layer
- 1 cup granulated sugar
- ½ cup unsweetened cocoa powder
- ¼ cup vegetable oil
- 2 large eggs
- 1 tsp vanilla extract
- 1 cup all-purpose flour
- 1 tsp baking powder
- ¼ tsp salt
- Optional
- Powdered sugar for dusting
Instructions
- . Make the Peanut Butter Kiss Base
- Preheat oven to 350°F. Line a 9×13 pan with parchment paper.
- In a medium bowl, whisk flour, baking soda, and salt.
- In a large bowl, cream the butter, granulated sugar, and brown sugar until fluffy.
- Mix in the peanut butter, egg, milk, and vanilla.
- Add the dry ingredients and mix until just combined.
- Press peanut butter dough firmly into the bottom of the prepared pan.
- Arrange the Hershey’s Kisses in neat rows standing straight up, with the tips pointing upward.
- Press each Kiss straight down only halfway—just enough so the base is anchored in the dough but the tip remains sticking up.
- Smooth the top
- Bake 10–12 minutes just to lightly set the peanut butter layer; do not fully bake.
- Chocolate Crinkle Layer
- Whisk together the flour, baking powder, and salt.
- In another bowl, mix sugar, cocoa powder, and oil until smooth.
- Add eggs one at a time, then vanilla.
- Add the dry ingredients and mix until just combined. Fold in chocolate chips if using.
- Drop spoonfuls of chocolate batter over the warm PB layer and gently spread into an even top layer.
- Bake for 20–25 minutes, until the chocolate layer looks set and no longer glossy.
- Cool completely before slicing
- Once cook, sprinkle top of bars with powdered sugar

Leave a Reply