

With its cloud-like interior, shiny golden crust, and gentle sweetness from honey, this Old Fashioned Challah Bread is just as beautiful as it is delicious. This classic braided loaf looks bakery-worthy, but it’s surprisingly simple to make at home — even if you’ve never baked bread before.
This easy challah bread recipe walks you through every step, from mixing the dough to braiding it like a pro. Made with basic pantry ingredients and minimal hands-on time, it’s the perfect homemade bread for both special occasions and everyday slices.
I also love using challah in other ways, like Challah Soft Pretzels, Challah Cinnamon Rolls, and Caramelized Onion & Sesame Seed Challah — it’s one of those breads that does everything.
Why You’ll Love This Challah Bread Recipe
- Soft, pillowy texture with just a hint of sweetness
- Beautiful braided loaf that looks impressive but is easy
- Simple, pantry ingredients
- No fancy equipment required
- Perfect for sandwiches, toast, French toast, or bread pudding
- Freezer-friendly and great for make-ahead baking
This is the kind of bread that feels special, but still fits into real life.
What Is Old Fashioned Challah Bread?
Challah is a traditional Jewish braided bread typically served on Shabbat (Friday night) and during holidays like Rosh Hashanah. The word challah simply means “loaf of bread,” but the recipe itself is known for its lightly sweet flavor, soft interior, and glossy crust.
This honey challah bread recipe makes two large loaves, making it perfect for sharing, gifting, or freezing for later.
Is Challah the Same as Brioche?
They’re similar — but not the same.
- Challah uses oil and honey, giving it a lighter texture and gentle sweetness
- Brioche uses butter and tastes richer and more buttery
Both are delicious, but challah is softer, lighter, and less rich, which makes it incredibly versatile.
Ingredients You’ll Need
This classic challah recipe uses straightforward ingredients you may already have on hand.
- Honey
- Kosher salt
- Oil or melted butter
- Lukewarm water
- All-purpose flour
- Active dry yeast
- Buttermilk (or milk + vinegar)
- Eggs (whole egg + yolks)
- Egg white (for egg wash)
Optional Toppings
- Sesame seeds
- Poppy seeds
- Everything bagel seasoning
How to Make Old Fashioned Challah Bread
Step 1: Activate the Yeast
Dissolve the yeast in warm water and let it sit for about 5 minutes, until foamy.
Step 2: Mix the Wet Ingredients
In a small bowl, combine honey, oil, salt, and the remaining warm water.
Step 3: Start the Dough
Add the yeast mixture and honey mixture to a stand mixer fitted with a dough hook (or a large bowl if mixing by hand).
Step 4: Add the Eggs
Mix in one whole egg and two egg yolks until fully incorporated.
Step 5: Build the Dough
Slowly add the flour, alternating with the buttermilk. Knead until the dough is soft, smooth, and elastic — about 3–5 minutes in a mixer or 7–8 minutes by hand.
Step 6: First Rise
Transfer the dough to a greased bowl, cover, and refrigerate for at least 2 hours or overnight. This slow rise improves flavor and texture.
Step 7: Shape & Braid
Divide the dough into three equal strands. Braid tightly and pinch the ends to seal.
Step 8: Egg Wash
Whisk the egg white with a splash of water and brush over the loaf. Add toppings if desired.
Step 9: Second Rise
Cover loosely and let rise at room temperature for 30 minutes.
Step 10: Bake
Bake at 350°F for about 30 minutes, until deeply golden. Cool completely before slicing.
How to Braid Challah Bread (Simple Method)
- Divide dough into three ropes
- Pinch the tops together
- Cross the right strand over the center
- Cross the left strand over the center
- Repeat and seal the ends
That’s it — no complicated techniques required.
Make-Ahead & Freezing Tips
Challah is one of the best breads to make ahead.
- Dough can be refrigerated for up to 24 hours
- Baked loaves freeze well for up to 3 months
- Slice before freezing so you can thaw one piece at a time
- Wrap tightly in plastic wrap, then foil for best freshness
Common Challah Bread Mistakes (and How to Avoid Them)
- Water too hot → kills the yeast
- Too much flour → dense bread
- Skipping the second rise → heavy loaf
- Over-baking → dry crumb
- Not sealing the braid ends → loaf unravels
A soft dough and patience make all the difference.
Storage & Freezing
Storage
Store challah at room temperature for up to 3 days, wrapped tightly.
Freezing
Freeze wrapped loaves or slices for up to 3 months.
Frequently Asked Questions
What should challah dough feel like?
Soft, elastic, and slightly tacky — not sticky. It should stretch without tearing.
Can I make challah without a stand mixer?
Yes. Knead by hand for about 7–8 minutes until smooth.
Does challah need buttermilk?
No. Regular milk works just fine.
Is challah sweet?
Only lightly. The honey adds a gentle sweetness without overpowering.
Can I add raisins?
Yes — add them during the final kneading stage.
Why refrigerate the dough?
Cold fermentation improves flavor and creates a better texture.
Why didn’t my challah rise?
Check that your yeast is fresh and your water isn’t too hot..
Other Challah Recipes
Chocolate Chip Challah Cinnamon Rolls
Old Fashioned Challah Soft Pretzels
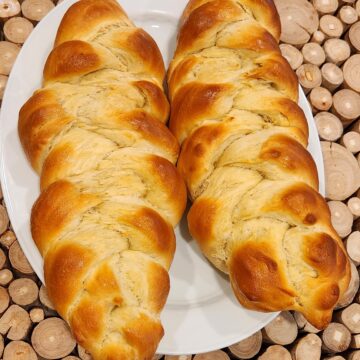
Old Fashioned Challah Bread
Ingredients
- ⅓ cup Honey
- Kosher Salt
- ⅓ cup oil or melted butter
- ½ cup Lukewarm water 1/4 to dissolve yeast and 1/4 to add to honey mixture
- 5 cups All-Purpose Flour
- 1 Egg white
- 3 eggs 1 egg + 2 yolks
- 2- ¼ oz packets Active dry yeast
- 1 cup Buttermilk
Instructions
- This recipe makes two loaves of challah bread
- In a small bowl combine 1/4 cup water, honey, oil or butter, and a pinch of salt
- Dissolve 2 pkgs (2 TBS) yeast into ¼ cup lukewarm water – make sure the water isn't too hot, and set aside until bubbly about 5 minutes
- Put the honey mixture and yeast mixture into the bowl of a standing mixer and , then mix in one egg and two egg yolks
- In a stand mixer, using the dough hook, slowly add 4-5 cups of flour alternating with buttermilk and knead until smooth and satiny (but not sticky – may need to add more flour) and mix on medium-low speed for about 3-5 minutes or 7 minutes if kneading by hand
- Refrigerate – Transfer dough to a large bowl oiled bowl, cover in plastic wrap, and place in refrigerator. Allow the dough to rise for at least 2 hours (the longer the better, and can even store it overnight)
- Remove from the refrigerator, punch down and roll out on a lightly floured surface
- Divide into three even strands using a pizza cutter and secure them together at the top (see image)
- Braid the dough from top to bottom alternating the right strand and left strand then secure the pieces together at the bottom
- Add water to egg white and whisk together
- Brush the tops of the loaf with egg wash
- You can also sprinkle sesame seeds, poppy seeds or everything seasoning
- Place the braided loaves on a well-greased baking sheet or lined with parchment paper, cover, and allow to rise an additional 30 minutes
- Bake in the oven at 350 degrees for 30 minutes or until golden brown – the total time shouldn't be more than 30 minutes and make sure to not overbake. You just want a slight golden color, but not dark brown.
- Remove from the pan and place on a wire rack to cool down

Thank you. I’m confused about 4 and 5. 4 tells me to make a lukewarm mixture with water and yeast, then 5 tells me to add yeast to the lukewarm mixture – does 5 maybe refer to adding to honey, water, oil mixture? Not sure bc 6 refers to them as two mixtures. Thanks for clarifying.
Hi Anita – Thank you for pointing this out! The yeast mixture step was in there twice. I’ve updated the recipe steps so they are accurate. Let me know how yours turns out 🙂
Stir in 1 egg and 2 egg yolks