

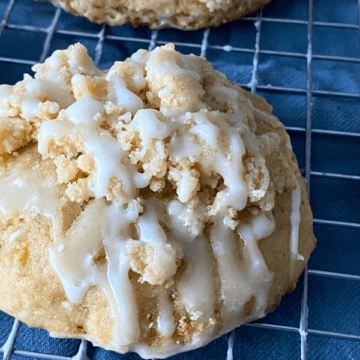
Looking for something different to do with ripe bananas? These chewy banana crumb cookies are one of those recipes you make once… and then keep coming back to.
They’re thick, soft, and full of real banana flavor, with a buttery crumble on top that makes them taste like banana bread and coffee cake in cookie form.
And the best part—they work with gluten-free or regular flour, and still come out bakery-style every time.
These Chewy Banana Crumb Cookies Taste Like Banana Bread Meets Coffee Cake
- Thick, soft, and chewy (not cakey)
- Rich banana flavor with deep brown sugar notes
- Buttery crumble topping = coffee cake vibes
- Made with simple ingredients
- Dough can be made ahead for even better flavor
The Texture (What Makes These Different)
These are not fluffy or cake-like cookies. Instead, they’re:
- Soft and dense in the center
- Structured (they hold their shape)
- Slightly crisp on the edges
- Finished with a crumb topping for contrast
That combo is what makes them feel bakery-style.
Why This Gluten-Free Version Works
Gluten-free baking can go one of two ways—dry or cakey. This avoids both.
- 1:1 gluten-free flour keeps it simple
- Cornstarch helps create that thick, soft texture
- Extra egg yolk adds richness and chew
- Chilling the dough prevents spreading and improves structure
- Controlled banana amount keeps them from turning cakey
Can I use another kind of gluten-free flour?
This recipe was tested with a 1:1 gluten-free flour blend (like Bob’s Red Mill), which already includes xanthan gum and is designed to replace regular flour cup-for-cup.
If you’re using a different gluten-free flour, here’s what to know:
- Check for xanthan gum
If your blend doesn’t include it, add ½ teaspoon xanthan gum to the dough. - Expect texture differences
Not all gluten-free flours behave the same—some absorb more moisture or bake up softer. Your cookies may be slightly more delicate or less chewy. - Let the dough rest before baking
Gluten-free flour needs time to hydrate. Let the dough sit for 10–15 minutes before chilling for the best texture. - Chilling is even more important
This helps the cookies hold their shape and prevents spreading.
Quick Tip
If you want the most consistent results, stick with a 1:1 blend. It’s the easiest way to get that thick, soft, bakery-style cookie without extra adjustments.
Can I Substitute with All-Purpose Flour for non gluten-free version
You can make these cookies with regular all-purpose flour instead of gluten-free. Use the same amount (2 cups) and omit the extra egg yolk. You can also skip the 10–15 minute dough rest, but chilling for at least 1 hour is still recommended. Bake at 375°F for 10–12 minutes for best texture.
Ingredients
Cookies
- 1 medium ripe banana, mashed (about ½ cup max)
- ½ cup unsalted butter, softened
- ¾ cup dark brown sugar
- ¼ cup granulated sugar
- 1 large egg
- 1 egg yolk
- 1 tsp vanilla extract
- 2 cups Bob’s Red Mill 1:1 Gluten-Free Flour
- ½ tsp salt
- ½ tsp baking powder
- 2 tsp cornstarch
Crumb Topping
- ½ cup butter, cold
- ⅔ cup gluten-free 1:1 flour
- ¼ cup brown sugar
- ¼ cup granulated sugar
How to Make Banana Crumb Cookies
1. Make the Dough
Cream butter, brown sugar, and granulated sugar until light and fluffy.
Add mashed banana, egg, egg yolk, and vanilla. Mix until combined.
In a separate bowl, whisk together gluten-free flour, cornstarch, salt, and baking powder.
Add dry ingredients to wet and mix until a dough forms.
Let the dough sit for 10–15 minutes (this helps hydrate the gluten-free flour), then refrigerate for at least 2 hours.
2. Make the Crumble
Cube cold butter and add to a bowl.
Add flour, brown sugar, and granulated sugar.
Mix until crumbly with pea-sized pieces.
Place in the freezer until ready to use.
3. Bake the Cookies
Preheat oven to 350°F and line a baking sheet.
Scoop dough onto the baking sheet.
Bake for 11–13 minutes, until edges are set but centers are still soft.
Let cookies cool for 5 minutes on the pan, then gently press about 1 tablespoon of crumble onto each cookie.
Transfer to a wire rack to cool completely.
Tips for the Best Gluten-Free Banana Cookies
- Use very ripe bananas (lots of brown spots)
- Don’t exceed ½ cup banana or cookies can get cakey
- Chill the dough—this is key for thickness
- Keep crumble cold so it stays crumbly
- Slightly underbake for soft, chewy centers
Storage
- Store in an airtight container at room temperature for 3–4 days
- Add parchment between layers
- Freeze for up to 1 month
FAQs
Will these taste gluten-free?
No—they’re soft, rich, and chewy with no gritty texture.
Why are my cookies cakey?
Too much banana or not enough chilling time.
Ingredients
- 1 medium ripe banana mashed (about ½ cup max)
- ½ cup unsalted butter softened
- ¾ cup dark brown sugar
- ¼ cup granulated sugar
- 1 large egg
- 1 egg yolk
- 1 tsp vanilla extract
- 2 cups Bob’s Red Mill 1:1 Gluten-Free Flour
- ½ tsp salt
- ½ tsp baking powder
- 2 tsp cornstarch
- Crumb Topping
- ½ cup butter cold
- ⅔ cup gluten-free 1:1 flour
- ¼ cup brown sugar
- ¼ cup granulated sugar
Instructions
- Cream butter, brown sugar, and granulated sugar until light and fluffy.
- Add mashed banana, egg, egg yolk, and vanilla. Mix until combined.
- In a separate bowl, whisk together gluten-free flour, cornstarch, salt, and baking powder.
- Add dry ingredients to wet and mix until a dough forms.
- Let the dough sit for 10–15 minutes (this helps hydrate the gluten-free flour), then refrigerate for at least 2 hours.
- CRUMBLE
- Cube cold butter and add to a bowl.
- Add flour, brown sugar, and granulated sugar.
- Mix until crumbly with pea-sized pieces.
- Place in the refrigerator until ready to use.
- Preheat oven to 350°F and line a baking sheet.
- Scoop dough onto the baking sheet.
- Bake for 11–13 minutes, until edges are set but centers are still soft.
- Let cookies cool for 5 minutes on the pan, then gently press about 1 tablespoon of crumble onto each cookie.
- Transfer to a wire rack to cool completely.

These sound delicious. I love anything Banana. But when do you add the crumble?
Hi Donna! I’m a banana lover too! The crumble gets added before baking – looks like I have that in the recipe card at the bottom of the page, but not in the instructions up top. Thanks so much for pointing that out, I’m going to update it now 🙂 I hope you enjoy them!